skip to main |
skip to sidebar
I'm loving getting up to brighter (and often sunnier!) mornings. But as I still relish a sleep in on the weekend a sleeping mask can be very handy, so I decided to create a prettier one-, modeled here by my kind boyfriend. Once you try these you will be completely won over and it's a very simple project indeed!

 So you need thread, elastic, fabrics for the back and front of your mask (so it's reversible), thin padding for the middle ( I used thin wool fabric) and your shape cut out on paper. Baking paper is a handy substitute for pattern paper.
To draw out your sleeping mask shape make sure its symmetrical by folding it down the center and cutting it out that way. You can find further shapes on google images- 'sleeping mask pattern'.
 Lay down your fabrics and elastic-
Firstly your 2 fabrics with the print/correct sides facing in on themselves.
Inside your patterned fabrics is your elastic. For the length place it around the back of your head, reaching from one temple to the other and add a couple cms. You want it snug but not tight. So it's inside your fabrics with the ends poking out each side
Then on the bottom the wool fabric/padding.
Now trace around your mask shape. You can do this in pencil as you won't see it.
Keep in mind that if the printed fabrics are stripes or a geometric design that you have them laid out correctly.
 Now a simple running stitch on the machine along the pencil line, taking the pins out before you reach them. Go nice and slowly around the curves, and leave a gap at the top or side of about 4 cm/3 finger width.
 Now trim around your sewn shape, leaving about a cm of fabric remaining.
 This is the back of the mask, with the wool fabric/padding. In case the fabric buckles a little later make some cuts ,through all the layers, at the tight curve where the nose will be. But don't get too close to the stitches!
 Now turn your mask inside out! Little fiddly. Then iron it, also neatly ironing the unstitched edges in preparation for hand stitching.
 Choose thread that blends in with your fabric, knot the end and insert it up under the fabric so the knot is hidden. You are now going to stitch neat diagonal tacking stitches the whole way along the gap. This is the same hand stitch as used in the make bunting project.
 Keep the stitches nice and small! And try to hide the knot at the end. You can always push it between the fabrics with the head of a pin. Remember you can also leave your gap along one of the sides.
 One of the fabrics I used was a print of my own, and this was fabric left over from altering a skirt. Enjoy your Sunday sleep ins and naps!
I have fallen for bunting totally and utterly. It just has so many uses! Outdoors, indoors, celebrations, brightening a room.. We use some lovely bunting when we run our textile workshops, but I decided to do a very very easy make post for bunting for those of you who are, so far, sewing machine less. And I can use it to brighten up my lovely studio!

 This is when you get to reward yourself for keeping (hoarding!) all those scraps of fabric. Using them up is so satisfying! Your fabrics don't need to match, just make sure you like how they all look together. You can use plain fabrics, printed or a mixture of both. If you are using only plain fabrics be sure to use a playful mix of colors.
 Using bias binding is the first great tip. You can get it in any good haberdashery. Wonderful word 'haberdashery'. Be sure to buy a color that works with your fabrics and the right length that you want. I bought 2 and half metres for this project.Now you need to fold the width in half while ironing it, keeping all the edges on the inside. The binding I bought happened to have some linen in it so I could fold it by hand first before ironing. This isn't a must.
 Make a template out of paper or card as a guide for your fabric triangles. Be sure that when you fold it in half the 2 sides are the same. Make the most of your fabric and make one tip longer, this will be the end that hangs down.
 Once you have drawn around your bunting, with a light pencil or tailors chalk its time for tip number 2. Crimping scissors! They create a lovely zigzag edge that is very pretty and doesn't fray. They are more expensive than normal scissors but they are well worth it.However cut the top of your triangles with a straight edge, as they will be inside the binding and a straight edge will be easier to catch when stitching.
 At this point place your first triangle inside your folded binding to check that your triangle is a size you like, a good check before you cut out the rest of your triangles.
 Remember to make the most of your fabric, place your triangles side by side and as close to each other as possible.
 Very satisfying cutting with crimping scissors.
 Lots of lovely triangles. I got slightly excited and cut too many, but these can be used for my next strand of bunting!
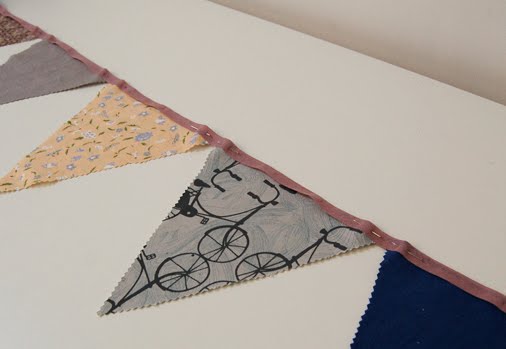
 Decide on the order of your fabric triangles and how much space you would like between them. Be sure that it is the same between each one. Place each triangle right up inside the binding and pin it down with a couple of pins. It's lovely deciding on the order of your fabrics. I loved using this bicycle print of mine, next to fabric left over from Laura Ashley curtains.
 Now for the hand stitching if you are sewing machineless. Choose thread that matches your binding, knot the end and insert it up into the binding so the knot is hidden.
  You are now going to stitch neat diagonal tacking stitches the whole way along the binding, (it's up to whether to do the strands at the beginning and end of the binding) . This stage you need to do while chatting or watching a film so it doesn't become tedious. You can relax but still be productive. And you will have some fabulous bunting as a result! Do use it for a celebration of any kind!
It had been years since I had learned crochet and produced a rather awful scarf. Recently one of my students asked me to show her some crochet skills and once I had reminded myself of them it opened up a whole world of tasteful crochet possibilities! This is edging or border is a lovely simple project, that shows you how just a few crochet stitches can be effective, and tasteful!
 This is your pattern for this edging-
Foundation chain of the required length-count your stitches, and make sure the chain is a multiple of 6 stitches +1
Row 1-1 chain,1 double double crochet in each stitch, turn
Row 2-1 chain *miss 2 stitches, 5 treble crochet in next double crochet, miss 2 stitches, 1 double crochet in next stitch, rep from * to end.
Fasten off.
I know that sounds complicated, but I promise its very simple! There's only 3 crochet stitches involved-chain, double crochet and triple crochet. Use your pattern as a reference. Before you undertake a project make a small sample piece, for practice and to make sure it looks as you expected.
 These are 2 versions of how to do a slip knot- the very first stitch on your hook!
 How to hold your yarn and hook! Tension is important- not to tight and not too loose. This will take practice.
 To create your foundation chain you catch the yarn and bring it all the way through the loop on your hook. Pass your hook under and around the yarn to catch it. The hook comes towards you at the start of the movement.
 This is your foundation chain. Don't forget to keep count! The first slip knot doesn't count as a stitch.
 If you haven't done so already be sure to measure the area you want to trim. I'm going to edge the empire line of this linen dress. There are a host of possibilities- cuffs, hems even creating very impressive ribbons for wrapping gifts.
 This the double crochet stitch. Once you have created a foundation chain of the required length (multiple of 6 +1). Turn at the end, add one chain stitch (your turning stitch) and go back along it working the double crochet into each stitch.
 Working the double crochet along..
 Finished row 1!
 Now for the treble crochet! Be sure to practice this one a bit first.
 Follow the pattern guide for row 2- 1 chain *miss 2 stitches, 5 treble crochet in next double crochet, miss 2 stitches, 1 double crochet in next stitch, rep from * to end.
 Coming along nicely!
 To finish cut your yarn and pull it through the last loop! Now it just needs to be sewn on. I attached it to the garment with small diagonal tacking stitches the same color as the yarn. All very simple and immensely satisfying! Now I just have to finish that dress..
This Make project is featured in the latest issue of Image Interiors, but I wanted to also share it with your lovely selves!
 Changing the cushion covers in your home for spring is a lovely, simple way to rejuvenate your house. You will need: A medium sized embroidery hoop, embroidery needles, threads and yarns, tailors chalk, scissors, pencil, paper and some relaxing time for production.
 The first step is to learn a few embroidery stitches. This is the only tricky part. It will be worth it I promise, as you will have these stitches under your belt for all your future projects! These are the stitches I used.
 Decide on your design and draw it out. Use any patterns or shapes you like as inspiration! Do remember to keep your final design shapes simple and strong to make them effective and easy. Planning out the whole placement of the design on paper first is a good idea as it saves from making mistakes later.
 Cutting up your drawings and making a stencil is a great guide to keep to your design. Draw your design with tailors chalk (or pencil) onto the fabric. Tailors chalk is very safe to start designing with as it rubs off! Break it up to get a sharp edge.
 Plan what colors and threads you are going to use and have them to hand. Try using a mix of sewing threads, embroidery threads and thin to medium yarns.
Keep your fabric uppermost in your hoop. Secure and slightly taut. Sit down, relax and start stitching! (Optional glass of wine)
 Remember to keep everything at the back of your fabric neat and secure. No long trailing threads. This way it will last longer with wear and tear.
By choosing colors that all work together, you can relax while your stitching and simply reach for closest yarn!
 Working on outlines can be very successful if you want a quick project. And running stitch is a great effective stitch and not too simple to use for your cushion cover! Mix up your stitches and threads to keep it contemporary and try overlapping your designs.
Above all enjoy relaxing and switching off!
This is a lovely easy project, all you need is a day at home as each layer of the cake stand needs a couple hours to set. I've wanted to make a cake stand with a mixture of plates for some time. And it was an adventure for me as it didn't involve stitching or printing!
The push to finally make a cake stand was thanks to the lovely publication 'ReMake it Home' by Henrietta Thompson , where they suggest using tea cups as the stands between plates. Genius! I tweaked it a bit and used 3 egg cups for the base as I want it to be nice and sturdy. Prepared to be weighed down with lovely edibles!
Have your surface covered very safely with plenty of newspaper. I recommend the sports section! Have everything you need to hand- crockery, ceramic glue (or some kind of heavy duty, waterproof glue that drys transparent), sandpaper, nail varnish remover, cloth/paper towels. I decided to feature one of my plates, 'Inquistive Birds', so I kept the other plates plain so as to draw attention to it as the main feature.
 Sandpaper the surfaces you're going to glue- the base of the biggest plate and the tops of the egg cups. I bought a fine sandpaper and a medium one, but I was just fine with the medium grain.
 In my excitement I sandpapered (and glued!) the bottom of the egg cups, so they are actually upside down. Never forget that even a simple project can so easily go astray! Often when you get very excited. But its never the end of the world. I think the upside down egg cups are a feature!
 First make sure your egg cups are spaced out in the right positions for being glued to the plate. Roughly an equal distance between them. Wipe away any dust from the sandpapering before you apply a nice, neat, thin line of glue. Place your plate carefully on top, making sure the egg cups don't move. It's absolutely fine only applying the glue to one side and not to the plate also.
 Magical nail varnish remover- it very neatly cleans away any stray glue that has snuck over the edges. Hold the plate steady while you do this. Now leave to set for 2 to 3 hours. It will be worth the wait!
 My upside down egg cups! It was only at this point that I noticed!!
 Now the middle layer. Sandpaper the top (not much to sandpaper there) and bottom of the teacup and the base of the middle sized plate.
 You could use a measuring tape at this point to make sure you will place the teacup in the middle of the plate. Line first the top of the teacup with glue, place upside down, then the top and place the middle plate on top.
 Now that there are a couple layers I placed a coffee table book neatly on top to help it all set very securely. Leave for 2 to 3 hours.

Time for the final layer. Repeat the same steps again, sandpaper both ends of the teacup and the bottom of the top plate.. I changed my mind and decided to use a saucer as my top plate, to give it a more staggered effect. My pretty spotted plate will just have to wait until my next cake stand. There is a third plate under there!
 Now it just needs to be filled! You can use your sturdy stand for all sorts of things as well as edibles- jewelery, sewing supplies or even by the door for keys and post. And it makes a lovely gift! Start hoarding those plates. My next one is going to be floral themed:)

 Creating your own inspiration can be very rewarding indeed. A couple summers ago I was commissioned to do a group of designs that involved farm animals. I was finding it very tough to get into the project and realized I needed to create some inspiration for myself. So I organized a trip and visited an lovely organic farm and photographed some obligingly photogenic animals! You can only imagine how easy the project was after that. Its often worth taking the time to create great starting points.. plus it can be hugely enjoyable!
 Slightly wary..
 Much more at ease, preparing for the photo.