Showing posts with label fabric. Show all posts

Thursday, May 13, 2010

Current V&A Delights

What wonderful exhibitions are on at the Victoria and Albert museum in London at the moment! Till the end of June there is their first Quilt exhibition and till the end of September Grace Kelly is their featured style icon. Libertys has even released a limited edition of printed fabrics for quilting in conjunction with the V&A. So in summary- visit!


My first introduction to textile art was Tracey Emin's quilts. Which made me look at my Grandma's beautiful traditional American quilts in a whole new light! What is exciting about this exhibition is that it summarizes transitions such as these as the quilts displayed are from 1700 to the present day.


The Grace Kelly, Style Icon exhibition showcases her wardrobe during her film career and also as Princess of Monaco. Thus spanning the 50s, 60s and 70s. I'm guessing the gowns and outfits from the 50s might be my favorites.

Wednesday, March 24, 2010

Extraordinarily Easy Bunting

I have fallen for bunting totally and utterly. It just has so many uses! Outdoors, indoors, celebrations, brightening a room.. We use some lovely bunting when we run our textile workshops, but I decided to do a very very easy make post for bunting for those of you who are, so far, sewing machine less. And I can use it to brighten up my lovely studio!


This is when you get to reward yourself for keeping (hoarding!) all those scraps of fabric. Using them up is so satisfying! Your fabrics don't need to match, just make sure you like how they all look together. You can use plain fabrics, printed or a mixture of both. If you are using only plain fabrics be sure to use a playful mix of colors.


Using bias binding is the first great tip. You can get it in any good haberdashery. Wonderful word 'haberdashery'. Be sure to buy a color that works with your fabrics and the right length that you want. I bought 2 and half metres for this project.Now you need to fold the width in half while ironing it, keeping all the edges on the inside. The binding I bought happened to have some linen in it so I could fold it by hand first before ironing. This isn't a must.


Make a template out of paper or card as a guide for your fabric triangles. Be sure that when you fold it in half the 2 sides are the same. Make the most of your fabric and make one tip longer, this will be the end that hangs down.


Once you have drawn around your bunting, with a light pencil or tailors chalk its time for tip number 2. Crimping scissors! They create a lovely zigzag edge that is very pretty and doesn't fray. They are more expensive than normal scissors but they are well worth it.
However cut the top of your triangles with a straight edge, as they will be inside the binding and a straight edge will be easier to catch when stitching.


At this point place your first triangle inside your folded binding to check that your triangle is a size you like, a good check before you cut out the rest of your triangles.


Remember to make the most of your fabric, place your triangles side by side and as close to each other as possible.


Very satisfying cutting with crimping scissors.


Lots of lovely triangles. I got slightly excited and cut too many, but these can be used for my next strand of bunting!


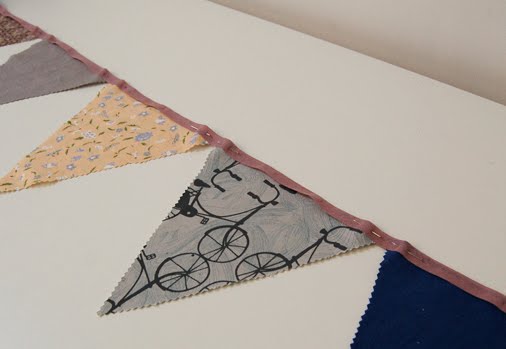
Decide on the order of your fabric triangles and how much space you would like between them. Be sure that it is the same between each one. Place each triangle right up inside the binding and pin it down with a couple of pins. It's lovely deciding on the order of your fabrics. I loved using this bicycle print of mine, next to fabric left over from Laura Ashley curtains.


Now for the hand stitching if you are sewing machineless. Choose thread that matches your binding, knot the end and insert it up into the binding so the knot is hidden.


You are now going to stitch neat diagonal tacking stitches the whole way along the binding, (it's up to whether to do the strands at the beginning and end of the binding) . This stage you need to do while chatting or watching a film so it doesn't become tedious. You can relax but still be productive. And you will have some fabulous bunting as a result! Do use it for a celebration of any kind!

Thursday, February 25, 2010

Apparel Resource


For printing onto garments American Apparel is the answer. Plenty of 100% cotton basics in lovely shapes; t-shirts, tank tops and even skirts, to satisfy all your garment printing wants! I just picked up a few t-shirts and tank tops for a new batch of screen printing:) Using stencils (see 'LiveLaughLove tea towel' post) and stamps (the creation of which I promise to cover in a future post) with fabric paint, you can just as easily create your own bespoke prints for garments. Remember to resist the lovely ribbed garments though- you need flat fabrics for printing.

American apparel garments are produced in LA, so no 'made very far away and unfairly labels' in sight. The higher the percentage of cotton, the longer the happy life ahead of the garment, so aim for 100% cotton, unless the garment is completely irresistible!
Depending where in the world you are buying, online can be cheaper. I wouldn't shy away from checking out garments in a shop and then purchasing it online if the difference is considerable. Definitely the way to go if you are buying quite a few items, as the shipping charge will be less.

But be warned! Their modeling shots can be rather cheeky, and much too much so on some pages. You could be looking at dresses and suddenly it turns very risque. Just so you know! The garments are great but the site can be scary! The t shirts and tank tops are fairly safe.